WSTunnel and WireGuard
Use case
As a service provider company with a tight firewall, I want to make a VPN between my company and another company, so that we can securely exchange data between systems in the two companies.
Overview
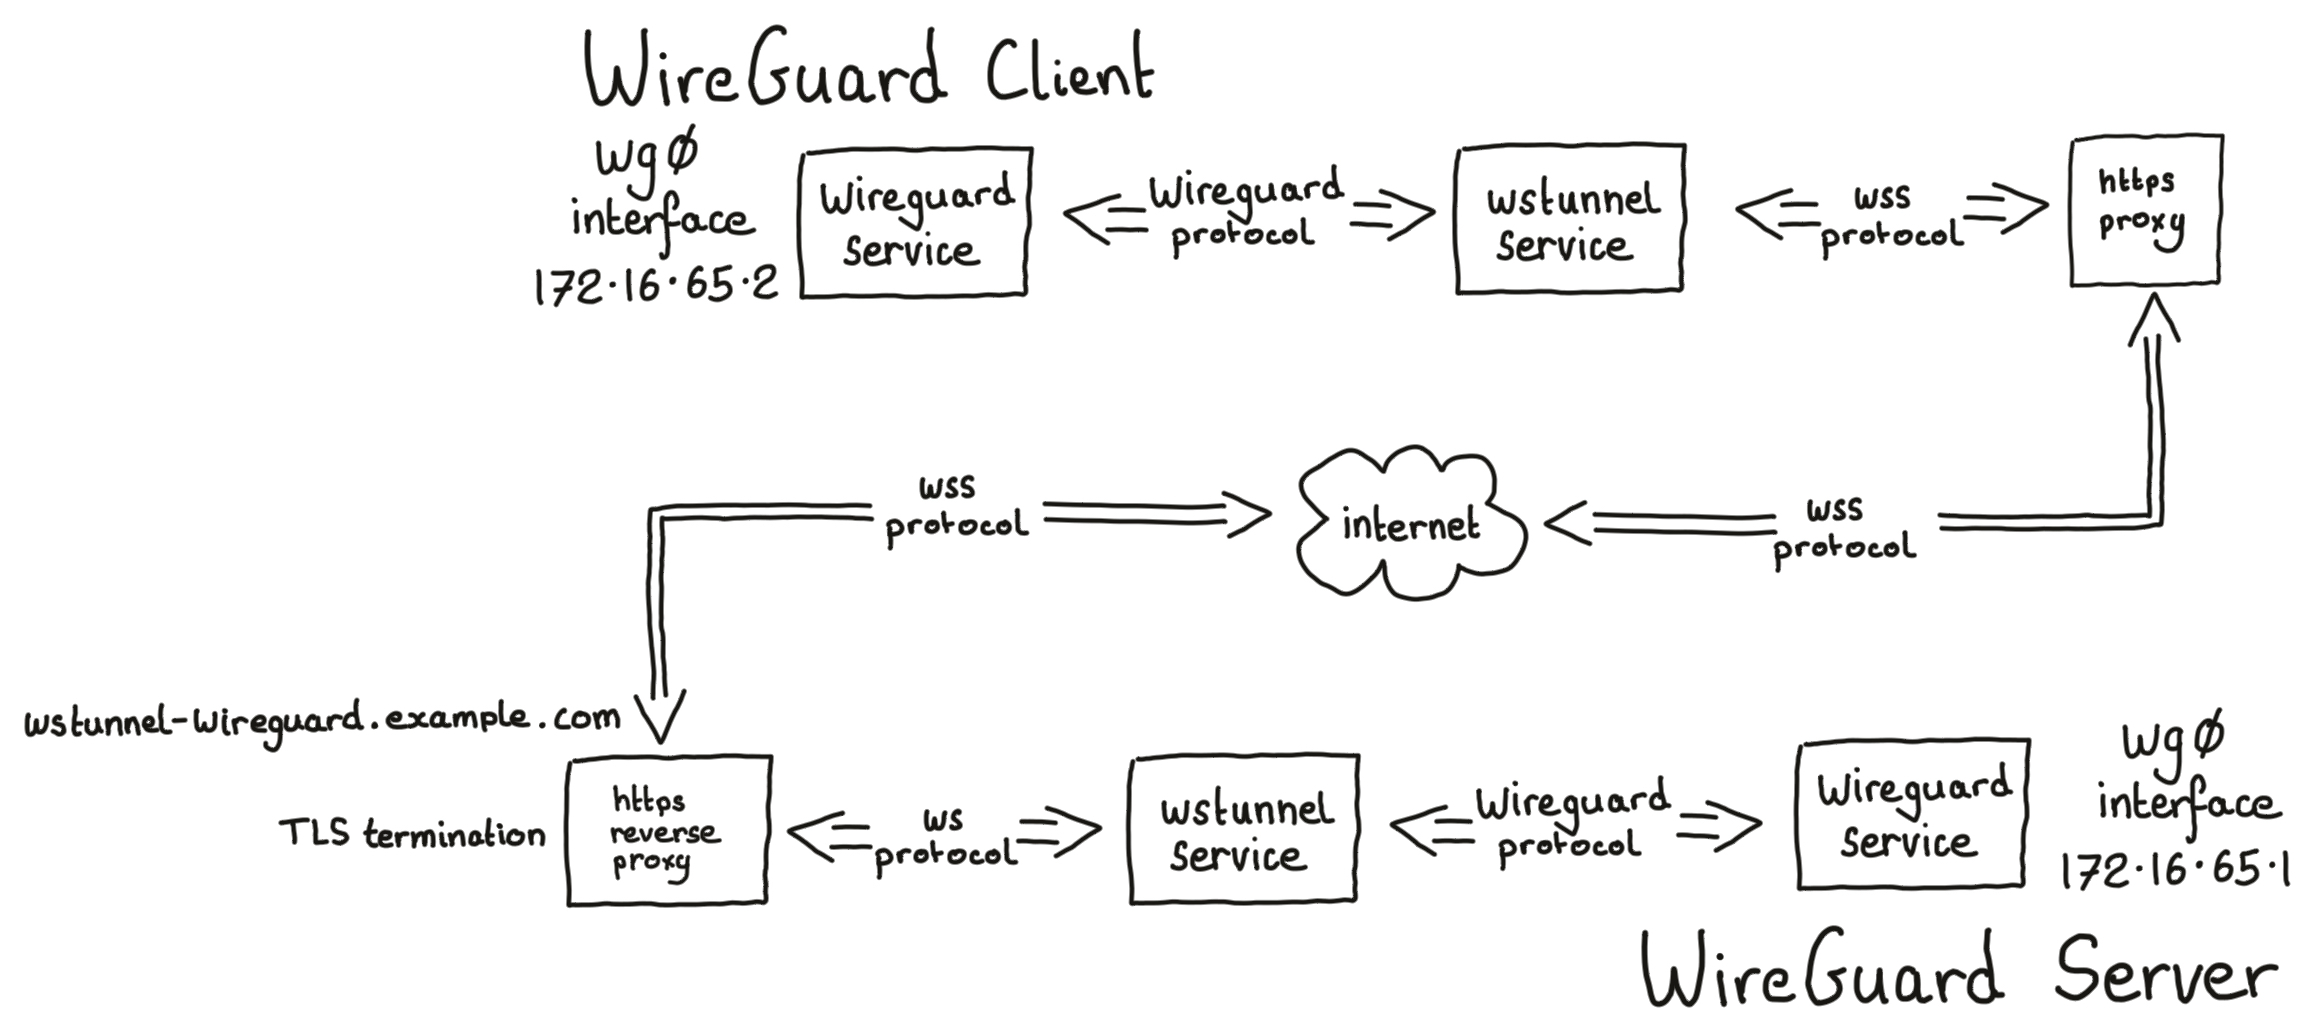
In this guide I’m going to demonstrate setting up an HTTPS based web-socket tunnel between to locations, using WSTunnel, and demonstrate running a VPN over that tunnel, using WireGuard.
The two locations will be:
- a network location which is behind a corporate firewall and has no UDP or TCP egress from the corporate network other than via an HTTP/HTTPS proxy
- a network location which can accept incoming incoming connections via an HTTPS reverse-proxy
There are many purposes for a VPN like this. One example is to transfer business data between a remote system and a corporate headquarters.

I’ve seen some guides which focus on configuring a WireGuard VPN and then tack on using a WSTunnel web-socket tunnel to tunnel the WireGuard VPN at the end of the article.
For me, that is backwards, especially for this requirement.
For this guide I will start by making and testing a WSTunnel HTTPS web-socket tunnel and then finish with tunnelling a WireGuard VPN within the WSTunnel web-socket tunnel.
Network topology
Ingredients
I’m going to use the following components:
- on the corporate network:
- a server that supports WireGuard. I’m going to use Linux server. I’ll need root access, which I will achieve using
sudo. This guide will call this server theWireGuird client. - a server that can run WSTunnel on the corporate network. I’m going to use the same Linux server as the
WireGuird client. I’ll need root access, which I will achieve usingsudo.
- a server that supports WireGuard. I’m going to use Linux server. I’ll need root access, which I will achieve using
- available on the corporate network, with access to the public Internet
- an HTTP/HTTPS proxy server, such as Squid proxy. I’m going to assume it exists already, but we will need.
- the hostname and port of it.
- publicly available from the Internet (either directly available or via a port forward on a NAT firewall):
- on the other network behind the reverse-proxy:
- a server that can run WSTunnel. This could either be the same Linux server which is running the Nginx HTTP/HTTPS reverse proxy, or the same Linux server which is running the WireGuard software.
- a server that supports WireGuard. I’m going to demonstrate how this can be achieved using a Linux server, and how this can be achieved using a Mikrotik router. I’ll need root access to the Linux server, which I will achieve using
sudo, or access to the Mikrotik command-line-interface / WebFig / Winbox. This guide will call this server theWireGuird server.
Software components:
- WireGuard tools
wgandwg-quickinstalled on a server on the corporate network, and installed on a server on the other network or a Mikrotik router on the other network. - WSTunnel installed on a server on the corporate network and on a server on the other network.
- an HTTP/HTTPS reverse proxy - Træfik or Nginx.
- curl - for downloading software and testing HTTP/HTTPS connections, installed on a server on the corporate network and on a server on the other network.
- ncat (or any other netcat variant) - for testing, installed on the
WireGuird clientserver on the corporate network and on theWireGuird serverserver on the other network. - Optional tcpdump - for testing, installed on the
WireGuird clientserver on the corporate network and on theWireGuird serverserver on the other network.
Install test tools
I gained shell access to both of the WireGuird client and the WireGuird server Linux servers and installed the tools curl, netcat, and tcpdump - for example, on Ubuntu 22.04 the commands I used are:
sudo apt update
sudo apt install curl ncat tcpdump
Options for installation
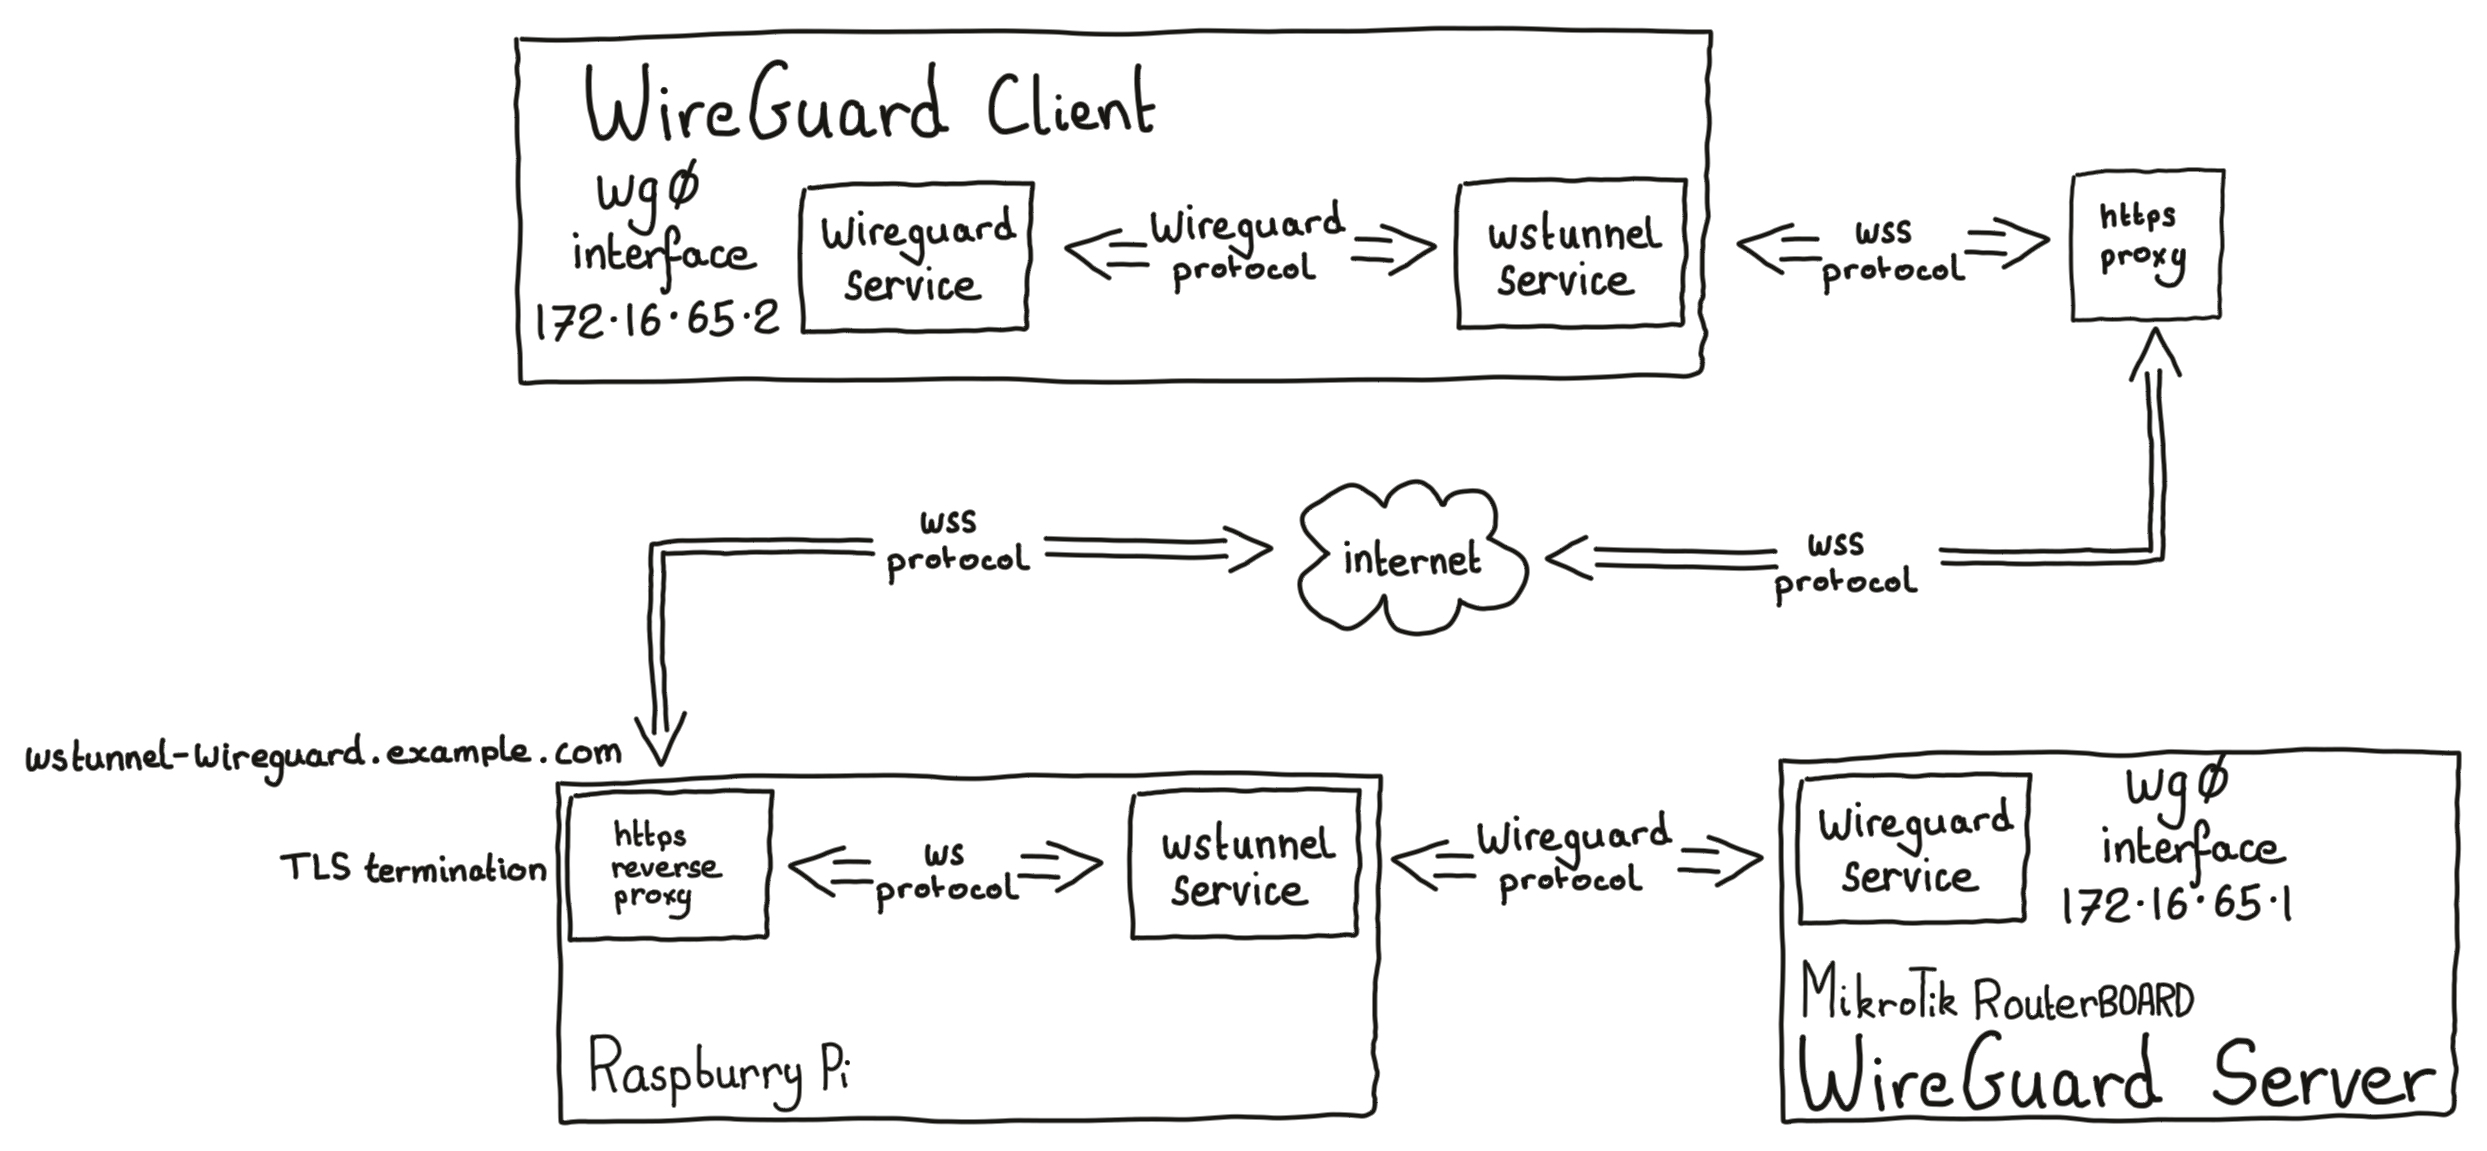
I’m going to describe two different options for installation, which might depend on the available servers at the server (non-corporate) end of the connection.
Option 1 - server to server
Option 2 - server to MikroTik router
Installation
I’m going to start in the bottom left of the network topology diagram by installing, configuring, and testing the http/https reverse proxy. Then I’m going to move in steps towards each of the two ends - installing, configuring, and testing each component in turn.
HTTP/HTTPS reverse proxy
This guide assumes that the HTTP/HTTPS reverse proxy is available from the Internet via a port-forward on my Internet gateway router.
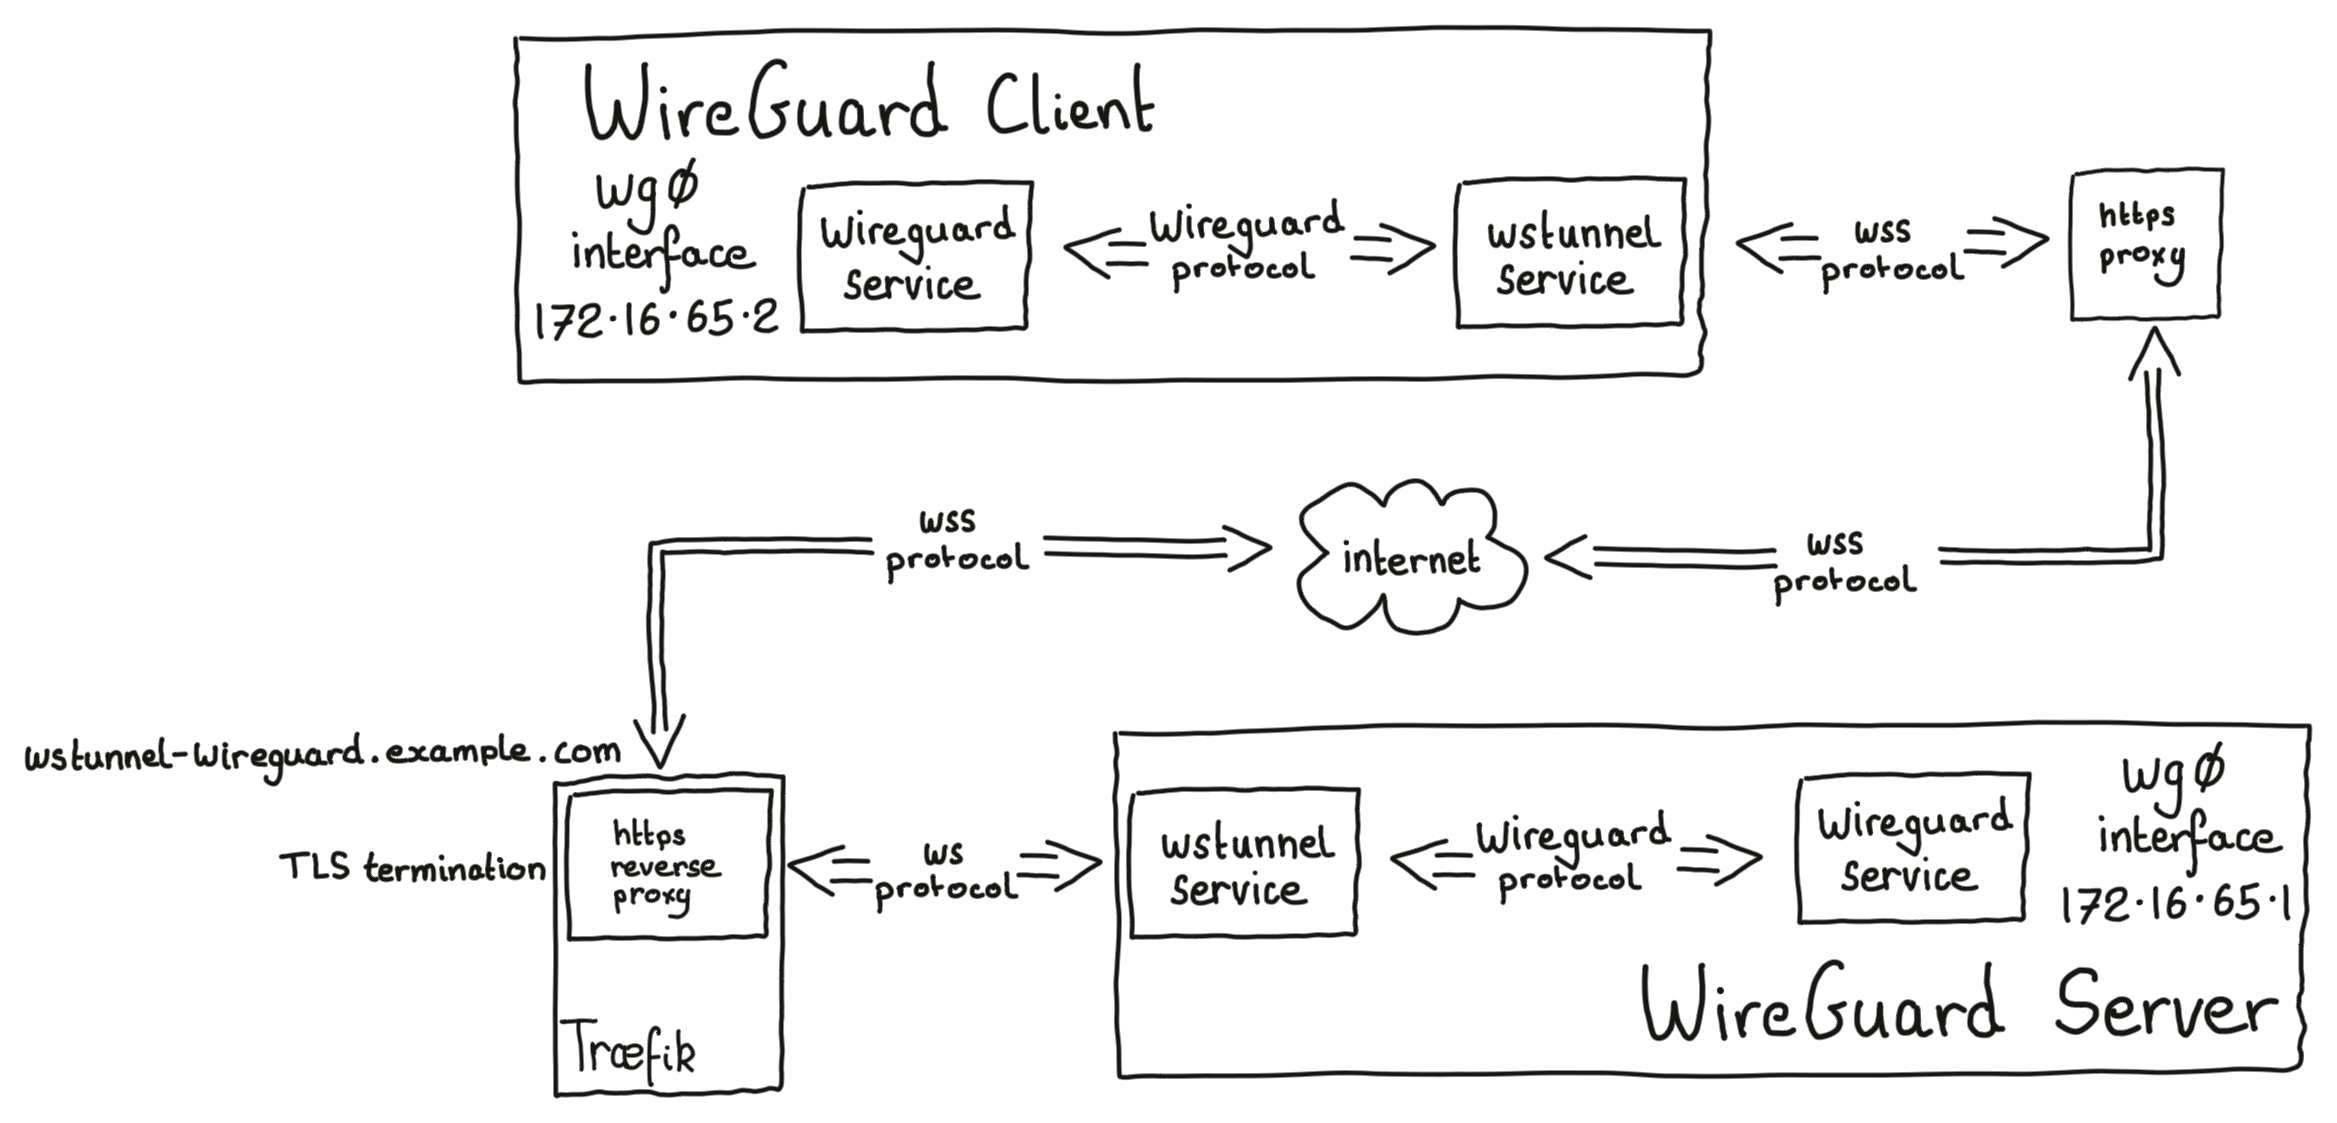
I’m going to describe two options for running the HTTP/HTTPS reverse proxy - my preferred method is to use the Træfik ingress controller running in my Kubernetes cluster, but an alternate method is to run Nginx on a Raspberry Pi.
Option 1 - Træfik ingress
Træfik is a reverse-proxy service, accepting incoming HTTP/HTTPS connections from the Internet. Træfik will be terminating TLS with a trusted certificate and routing the incoming web-socket connection onto the WSTunnel server.
This guide assumes that Træfik is running in a Kubernetes cluster, and the Træfik websecure entrypoint is publicly accessible from the Internet via some form of LoadBalancer.
This guide also assumes that you have an HTTPS TLS certificate and key for the hostname you are using stored in a secret and available for Træfik to use.
Træfik routing to Services with ExternalNames
Træfik must allow routing to Services of type ExternalName. As described in this post, in Træfik version 2 my Træfik Deployment had to be updated by adding the following into the Træfik container’s args, and restarting the deployment.
            - '--providers.kubernetesingress.allowemptyservices=true'
            - '--providers.kubernetesingress.allowexternalnameservices=true'
            - '--providers.kubernetescrd.allowemptyservices=true'
            - '--providers.kubernetescrd.allowexternalnameservices=true'
Træfik manifest
The example Kubernetes manifest below will create:
- a new
Namespacein the Kubernetes cluster - a new
Servicein theNamespacewith anExternalNamepointing to theWireGuard serverLinux server - a Træfik
ServersTransportin theNamespacewhich configurs how Træfik will connect to theService - a Træfik
IngressRoutein theNamespacerouting all connections to the configured hostwstunnel-wireguard.example.comthrough to the KubernetesService
For this example I’m using a TLS certificate and key which are already stored in the namespace, but you could use a certificate management service - but that’s way beyond the scope of this guide.
---
apiVersion: v1
kind: Namespace
metadata:
  name: wstunnel
---
apiVersion: v1
kind: Service
metadata:
  name: wstunnel
  namespace: wstunnel
spec:
  type: ExternalName
  externalName: wstunnel-wireguard.lan
---
apiVersion: traefik.containo.us/v1alpha1
kind: ServersTransport
metadata:
  name: traefik-servers-transport
  namespace: wstunnel
spec:
  serverName: "wstunnel-wireguard.lan"
  insecureSkipVerify: true
---
apiVersion: traefik.containo.us/v1alpha1
kind: IngressRoute
metadata:
  name: wstunnel-https
  namespace: wstunnel
spec:
  entryPoints:
    - websecure
  routes:
    - kind: Rule
      match: Host(`wstunnel-wireguard.example.com`)
      services:
        - kind: Service
          name: wstunnel
          namespace: wstunnel
          port: 8080
          serversTransport: traefik-servers-transport
  tls:
    secretName: wstunnel-wireguard.example.com-tls-secret
...
I saved that manifest and applied it to my Kubernetes cluster.
kubectl config use-context <MY-KUBERNETES-CLUSTER-CONTEXT>
kubectl apply -f wstunnel-reverse-proxy.yaml
Option 2 - Nginx service on a Raspberry Pi
This guide assumes that you have a 64 bit Raspberry Pi (model 3B or greater) with 64 bit Raspberry Pi OS Lite installed and configured.
This guide also assumes that you have HTTPS TLS certificates for the hostname you are using saved on the filesystem of the Raspberry Pi and available for Nginx to use.
Install Nginx
sudo apt install nginx
Nginx service configuration
cat <<EOF | sudo tee /etc/nginx/sites-available/wswg >/dev/null
server {
    listen 443 ssl;
    server_name wstunnel-wireguard.example.com;

    ssl_certificate     /home/pi/wswg_certs/public.crt;
    ssl_certificate_key /home/pi/wswg_certs/private.key;
    ssl_protocols       TLSv1.2;
    ssl_ciphers         HIGH:!aNULL:!MD5;

    # To allow special characters in headers
    ignore_invalid_headers off;
    # Allow any size file to be uploaded.
    # Set to a value such as 1000m; to restrict file size to a specific value
    client_max_body_size 0;
    # To disable buffering
    proxy_buffering off;

    # redirect server error pages to the static page /50x.html
    #
    error_page   500 502 503 504  /50x.html;
    location = /50x.html {
        root   /usr/share/nginx/html;
    }

    location / {
        proxy_set_header X-Real-IP \$remote_addr;
        proxy_set_header X-Forwarded-For \$proxy_add_x_forwarded_for;
        proxy_set_header X-Forwarded-Proto \$scheme;
        proxy_set_header Host \$http_host;

        proxy_connect_timeout 300;
        # Default is HTTP/1, keepalive is only enabled in HTTP/1.1
        proxy_http_version 1.1;
        proxy_set_header Connection "";
        chunked_transfer_encoding off;

        proxy_pass http://127.0.0.1:8080;
    }
}
EOF
You will note that the location of the HTTPS TLS certificate and key must match the location where I saved the files.
Now I disabled the default site config and enabled the new site config, and reload Nginx.
sudo rm /etc/nginx/sites-enabled/default
sudo ln -sf /etc/nginx/sites-available/wswg /etc/nginx/sites-enabled/wswg
sudo systemctl reload nginx.service
Test HTTPS routing
I gained shell access to the WireGuard server Linux server and ran ncat listening on port 8080, which is the port defined in the Træfik IngressRoute and the Nginx server where the WSTunnel will be running.
ncat -k -l 0.0.0.0 8080
Then I connected using HTTPS to the HTTPS reverse proxy service requesting the host I defined - in my example that is https://wstunnel-wireguard.example.com.
To do so I gained shell access to the WireGuard client Linux server and tested that it can connect to the WireGuard server via the corporate forward HTTP/HTTPS proxy and the Træfik Service.
HTTPS_PROXY=http://corporate.proxy curl -v https://wstunnel-wireguard.example.com
On the console of the WireGuard server running ncat behind the HTTPS reverse proxy I saw the connection attempt (in this case from the Træfik Service).
GET / HTTP/1.1
Host: wstunnel-wireguard.example.com
User-Agent: curl/7.68.0
Accept: */*
X-Forwarded-For: 10.42.2.1
X-Forwarded-Host: wstunnel-wireguard.example.com
X-Forwarded-Port: 443
X-Forwarded-Proto: https
X-Forwarded-Server: traefik-65d7b75858-pgs6m
X-Real-Ip: 10.42.2.1
Accept-Encoding: gzip
The curl command will hang for a while because ncat will not be returning any valid HTTP response to curl, so I needed to stop curl using CTRL-C.
When that worked I stopped the ncat process with CTRL-C.
If I needed to debug Træfik I could have added the following into the Træfik container’s args and restarted the deployment.
- '--log.level=DEBUG'
Install WSTunnel
WSTunnel is going to be installed and configured on the WireGuard client and either on a dedicated WireGuard server machine along with WireGuard, or it’s going to be installed on the Raspberry Pi where the Nginx HTTP/HTTPS reverse proxy is installed.
I gained shell access to both the Linux servers and download the latest version of WSTunnel from the releases page https://github.com/erebe/wstunnel/releases - at the time of writing it’s version 4.1. For the dedicated WireGuard server I downloaded the linux-x64 version, on the Raspberry Pi I downloaded the linux-aarch64.zip and extracted the zip file. I moved wstunnel into /usr/local/bin/ and made it executable by everyone.
# WireGuard client
HTTPS_PROXY=http://corporate.proxy curl -o wstunnel https://github.com/erebe/wstunnel/releases/download/v4.1/wstunnel-x64-linux

# WireGuard server
curl -L -o wstunnel https://github.com/erebe/wstunnel/releases/download/v4.1/wstunnel-x64-linux
sudo mv wstunnel /usr/local/bin/wstunnel
sudo chmod a+x /usr/local/bin/wstunnel

## Raspberry Pi
curl -L -o wstunnel.zip https://github.com/erebe/wstunnel/releases/download/v4.1/wstunnel-aarch64-linux.zip
unzip wstunnel.zip
sudo mv wstunnel_aarch64 /usr/local/bin/wstunnel
sudo chmod a+x /usr/local/bin/wstunnel
sudo apt install libnuma1
Manually run a WSTunnel applications to create the tunnel between the WireGuard client and WireGuard server
I gained shell access to the WireGuard server Linux server and ran WSTunnel as a server waiting for a client to connect.
/usr/local/bin/wstunnel -v --server ws://0.0.0.0:8080 --restrictTo=127.0.0.1:51820
The --restrictTo= parameter above is correct for the case where WSTunnel and WireGuard are going to be installed on the dedicated WireGuard server server.
In another shell on the same the WSTunnel server Linux server I ran ncat listening for UDP traffic on port 51820:
ncat -u -l 127.0.0.1 51820
I gained shell access to the WireGuard client Linux server and ran WSTunnel as a client connecting to the server.
/usr/local/bin/wstunnel -v --udp --udpTimeoutSec -1 -L 127.0.0.1:51820:127.0.0.1:51820 -p corporate.proxy:80 wss://wstunnel-wireguard.example.com:443
In another shell on the same the WireGuard client Linux server ran ncat connecting to UDP port 51820:
ncat -u 127.0.0.1 51820
I could now type a line of text into both of the the ncat shells on the WireGuard client and the WireGuard server and when I press the enter key the line of text appeared on the other ncat shell.
I can also watch the data being sent in each direction by opening another shell on the WireGuard client and using TCPDump.
sudo tcpdump -i eno1 host corporate.proxy
When that worked I stopped both of the ncat processes and both of the wstunnel processes with CTRL-C.
Option 2 only - Run WSTunnel on one server and WireGuard on another server
Where I have WSTunnel installed on a Raspberry Pi and I intend to use WireGuard configured on a Mikrotik router, once I have tested the WSTunnel link I needed to change the --restrictTo= parameter to be the IPv4 address of my Mikrotik router and the port that WireGuard is configured to listen on - for instance:
/usr/local/bin/wstunnel -v --server ws://0.0.0.0:8080 --restrictTo=192.168.88.1:51820
Install WSTunnel services to create the tunnel between the WireGuard client and WireGuard server
Create systemctl unit files to start and run the WSTunnel commands.
Install WSTunnel on WireGuard Server
I gained shell access to the WireGuard server Linux server and created a systemd init file /etc/systemd/system/wstunnel.service:
cat <<EOF | sudo tee /etc/systemd/system/wstunnel.service >/dev/null
[Unit]
Description=WSTunnel server over which to tunnel WireGuard UDP VPN
After=network.target
StartLimitIntervalSec=0

[Service]
Type=simple
User=nobody
ExecStart=/usr/local/bin/wstunnel -v --server ws://0.0.0.0:8080 --restrictTo=127.0.0.1:51820
Restart=always
RestartSec=3

[Install]
WantedBy=multi-user.target
EOF
The ExecStart command line on the WireGuard server is exactly the same as was run manually above.
Note the comments about the --restrictTo= parameter above.
I enabled and started the service:
sudo systemctl enable --now wstunnel.service
The logs for this service can be monitored in the normal way:
sudo journalctl -f -u wstunnel
Install WSTunnel on WireGuard Client
I gained shell access to the WireGuard client Linux server and created a systemd init file /etc/systemd/system/wstunnel.service.
cat <<EOF | sudo tee /etc/systemd/system/wstunnel.service >/dev/null
[Unit]
Description=WSTunnel client over which to tunnel WireGuard UDP VPN
After=network.target

[Service]
Type=simple
User=nobody
ExecStart=/usr/local/bin/wstunnel -v --udp --udpTimeoutSec -1 -L 127.0.0.1:51820:127.0.0.1:51820 -p corporate.proxy:80 wss://wstunnel-wireguard.example.com:443
Restart=yes

[Install]
WantedBy=multi-user.target
EOF
The ExecStart command line on the WireGuard client is exactly the same as was run manually above.
I enabled and started the service:
sudo systemctl enable --now wstunnel.service
The logs for this service can be monitored in the normal way:
sudo journalctl -f -u wstunnel
Test WSTunnel services
The systemctl managed WSTunnel services were tested in the same was as the manually run WSTunnel above, by running ncat at the two ends and exchanging lines of text and by watching tcpdump.
WireGuard
Create WireGuard keys and configuration files such that systemctl can start and run the WireGuard VPN using the WSTunnel.
Install WireGuard software
I gained shell access to both the WireGuard server and the WireGuard client the Linux servers and installed the Wireguard tools - for example, on Ubuntu 22.04 the commands would be:
sudo apt install wireguard
Create public and private keys
I created a private key and a public key for both of the WireGuard servers. The private key should be kept private and secure. As seen on the WireGuard quickstart guide, the generic way to create a WireGuard private key and public key is to use the wg command.
wg genkey | tee privatekey | wg pubkey > publickey
The WireGuard server and the WireGuard client both require their own private key and a public key. This was be done securely and privately on a completely separate server, for example:
sudo bash -c "umask 077 && wg genkey | tee server-privatekey | wg pubkey > server-publickey"
sudo bash -c "umask 077 && wg genkey | tee client-privatekey | wg pubkey > client-publickey"
Four files will have been created.
$ ls -l
-rw------- 1 root root 45 Dec 01 12:37 client-privatekey
-rw------- 1 root root 45 Dec 01 12:37 client-publickey
-rw------- 1 root root 45 Dec 01 12:37 server-privatekey
-rw------- 1 root root 45 Dec 01 12:37 server-publickey
When the WireGuard config files are created below, the WireGuard server config file will require the contents of the server-privatekey and the client-publickey files, and the WireGuard client config file will require the contents of the client-privatekey and the server-publickey files.
The contents of the files can be viewed using sudo cat. The contents of the privatekey files should be transferred securely, perhaps using copy/paste in ssh terminals.
$ sudo cat client-publickey
Sb8BGMV0MNlSZRbtyCBC/l1DYUUmUAl1TbDOOQUApgE=
WireGuard MTU
The MTU has been calculated based on a underlying network capable of carrying 1500 byte packets carrying IPv4 carrying TCP carrying IPv4 carrying UDP carrying WireGuard wrapped data. (1500 - 20 - 20 - 20 - 8 - 32 = 1400). If the underlying network has smaller packets, for instance if part of the link uses PPPoE, then I would have reduced the MTU as appropriate.
WireGuard VPN network
I have picked the network 172.16.65.0/24 for the VPN between the WireGuard client and WireGuard server, with the WireGuard server being 172.16.65.1 and the WireGuard client being 172.16.65.2. These IP address are irrespective of the IP addresses on the current Ethernet (or other) interfaces which already exist on the WireGuard server and the WireGuard client.
Configure WireGuard server
The WireGuard server will listen for incoming UDP packets on port 51820, and will expect a connection with the WireGuard client’s public key.
I gained shell access to the WireGuard server and created a WireGuard config file:
sudo bash -c "umask 077 && cat <<EOF | tee /etc/wireguard/wg0.conf >/dev/null
[Interface]
Address = 172.16.65.1/24
ListenPort = 51820
PrivateKey = <server-privatekey>
MTU = 1400

[Peer]
PublicKey = <client-publickey>
AllowedIPs = 172.16.65.2/32
PersistentKeepalive = 24
EOF"
I securely replaced the placeholders <server-privatekey> and <client-publickey> with the contents of the files created above.
The WireGuard service was enabled and started.
sudo systemctl enable --now wg-quick@wg0.service
Configure WireGuard client
The WireGuard client will send WireGuard encrypted data to the ‘remote’ EndPoint - port 51820 of the localhost interface, which is where the WSTunnel service is listening for data and transporting it to the WireGuard server. It will expect the WireGuard server at the other end to have the WireGuard server’s public key.
I gained shell access to the WireGuard client and created a WireGuard config file:
sudo bash -c "umask 077 && cat <<EOF | tee /etc/wireguard/wg0.conf >/dev/null
[Interface]
Address = 172.16.65.2/24
PrivateKey = <client-privatekey>
MTU = 1400

[Peer]
PublicKey = <server-publickey>
Endpoint = 127.0.0.1:51820
AllowedIPs = 172.16.65.1/32
PersistentKeepalive = 25
EOF"
I securely replaced the placeholders <client-privatekey> and <server-publickey> with the contents of the files created above.
The WireGuard service was enabled and started.
sudo systemctl enable --now wg-quick@wg0.service
Test WireGuard VPN connection
To confirm that everything is working I checked that the wg0 network interfaces exist, that routes have been created down the WireGuard VPN, and that unfragmentable ping packets up to 28 bytes less that the MTU could be exchanged between the two ends of the VPN.
On the WireGuard client:
$ ip link list type wireguard
53457: wg0: <POINTOPOINT,NOARP,UP,LOWER_UP> mtu 1400 qdisc noqueue state UNKNOWN mode DEFAULT group default qlen 1000
    link/none

$ ip address show wg0
53457: wg0: <POINTOPOINT,NOARP,UP,LOWER_UP> mtu 1400 qdisc noqueue state UNKNOWN group default qlen 1000
    link/none
    inet 172.16.65.2/24 scope global wg0
       valid_lft forever preferred_lft forever

$ ip route list root 172.16.65.2/24
172.16.65.0/24 dev wg0 proto kernel scope link src 172.16.65.2

$ ping -c 1 -M do -s 1372 172.16.65.1
PING 172.16.65.1 (172.16.65.1) 1372(1400) bytes of data.
1380 bytes from 172.16.65.1: icmp_seq=1 ttl=64 time=14.8 ms

--- 172.16.65.1 ping statistics ---
1 packets transmitted, 1 received, 0% packet loss, time 0ms
rtt min/avg/max/mdev = 14.834/14.834/14.834/0.000 ms
On the WireGuard server:
$ ip link list type wireguard
5: wg0: <POINTOPOINT,NOARP,UP,LOWER_UP> mtu 1400 qdisc noqueue state UNKNOWN mode DEFAULT group default qlen 1000
    link/none

$ ip address show wg0
5: wg0: <POINTOPOINT,NOARP,UP,LOWER_UP> mtu 1400 qdisc noqueue state UNKNOWN group default qlen 1000
    link/none
    inet 172.16.65.1/24 scope global wg0
       valid_lft forever preferred_lft forever

$ ip route list root 172.16.65.1/24
172.16.65.0/24 dev wg0 proto kernel scope link src 172.16.65.1

$ ping -c 1 -M do -s 1372 172.16.65.2
PING 172.16.65.2 (172.16.65.2) 1372(1400) bytes of data.
1380 bytes from 172.16.65.2: icmp_seq=1 ttl=64 time=13.2 ms

--- 172.16.65.2 ping statistics ---
1 packets transmitted, 1 received, 0% packet loss, time 0ms
rtt min/avg/max/mdev = 13.198/13.198/13.198/0.000 ms
I can also watch the data being sent in each direction by opening another shell on the WireGuard client and using TCPDump.
sudo tcpdump -i eno1 host corporate.proxy
Improvements
Make Træfik IngressRoute more specific
Right at the start of this article I created a Træfik IngressRoute with a rule which selected all connections to the host wstunnel-wireguard.example.com to be forwarded to the WSTunnel service.
  routes:
    - kind: Rule
      match: Host(`wstunnel-wireguard.example.com`)
WSTunnel uses the path of the WebSocket to decide the destination of the tunnel.
I know that the WSTunnel service on the WireGuard server will only be forwarding a WebSocket tunnel to the WireGuard service listening on UDP port 51820 of 127.0.0.1.
I even configured the WSTunnel service on the WireGuard server to restrict connections only to port 51820 of 127.0.0.1 using the command line parameter --restrictTo=127.0.0.1:51820.
The path that WSTunnel uses for this destination is /wstunnel/udp/127.0.0.1/51820
When I try to GET to any random path on the host wstunnel-wireguard.example.com Træfik will forward it to the WSTunnel service WSTunnel will return an HTTP status 400 and a body of Invalid tunneling information unless the path exactly matches the path that WSTunnel expects. WSTunnel also logs Rejecting connection - visible with sudo journalctl -f -u wstunnel.
Basic security best practices says that I should expose as little of our services as possible. Therefore, I should configure Træfik to only pass WebSocket connections which exactly match the above path through to the WSTunnel service.
I can achieve this by updating the manifest to match on the host and the path and apply that manifest again.
  routes:
    - kind: Rule
      match: Host(`wstunnel-wireguard.example.com`) && Path(`/wstunnel/udp/127.0.0.1/51820`)
kubectl apply -f wstunnel-reverse-proxy.yaml
With that change applied, when I try to GET to any random path on the host wstunnel-wireguard.example.com the request is no longer forwarded to the WSTunnel service. Instead Træfik returns an HTTP status 404 and a body of 404 page not found.
But the WireGuard VPN continues to function exactly as before, because the exact path the WSTunnel is using to transport the WireGuard VPN will be forwarded to the WSTunnel service.